Imagine bringing Woody, the beloved sheriff from Toy Story, to life on paper with just a few strokes of your pencil. Drawing him can be both fun and fulfilling, especially when you know the right techniques.
Whether you’re a seasoned artist or a beginner eager to learn, capturing Woody’s iconic look can be easier than you think. This guide is crafted specifically for you, breaking down the process into simple steps that anyone can follow. By the end, you’ll be amazed at your ability to recreate one of Pixar’s most endearing characters.
Dive in, and discover how you can transform your blank canvas into a vibrant portrayal of Woody. Your creative adventure starts here.

Credit: www.youtube.com
Materials Needed
Gather paper, pencils, erasers, and colored markers. A reference image of Woody helps capture details accurately.
To draw Woody from Toy Story, having the right materials is essential. Using the correct tools can make the drawing process smoother and more enjoyable. This section provides a list of materials needed to bring Woody to life on paper. Each item is chosen to help you achieve the best results in your drawing journey.Drawing Paper
Choose a good quality drawing paper. It should be smooth and sturdy. A4 or letter size works well for beginners.Pencils
Use a range of pencils from HB to 6B. They help create different shades and textures.Eraser
A soft eraser is important. It will help you correct mistakes without damaging the paper.Fine Tip Markers
Markers are great for outlining. They give your drawing a clean and finished look.Colored Pencils
Use colored pencils to add life to your drawing. Choose colors that match Woody’s vibrant outfit.Pencil Sharpener
A sharp pencil is crucial for detailed work. Keep your pencils sharp for the best results.Ruler
A ruler helps in drawing straight lines. It’s useful for Woody’s cowboy hat and other details.Reference Image
Having a clear reference image of Woody is helpful. It ensures accuracy in your drawing. With these materials, you’re all set to start drawing Woody. Enjoy the creative process!Basic Shapes And Proportions
Drawing Woody from Toy Story can be a fun and rewarding experience. Understanding basic shapes and proportions is crucial for capturing his iconic look. Woody’s design relies on simple geometric shapes, making it accessible for artists of all skill levels. By focusing on these foundational elements, you’ll be able to create a character sketch that closely resembles the beloved cowboy.
Drawing Woody’s Head
Start with an oval for Woody’s head. This shape forms the base structure. Woody’s face is elongated, so make the oval slightly longer. Add a horizontal line across the middle for eye placement. Use a vertical line to divide the face symmetrically. Woody’s cowboy hat is wide and sits atop the head. Sketch a large, curved rectangle for the brim. Draw a semicircle for the top of the hat.
Sketching The Body Structure
Woody’s body is slender and elongated. Use a rectangle for the torso. This will help in maintaining proportion. Draw two long rectangles for arms. Woody’s legs are slightly longer, so extend the rectangles downward. His boots are large and rounded. Sketch oval shapes at the bottom of the legs. The belt and holster add detail. Draw a small rectangle around the waist for the belt, and a triangle shape for the holster.
Facial Features
Drawing Woody from Toy Story can be a thrilling experience, especially when you focus on capturing his unique facial features. Woody’s face is filled with character and charm, from his expressive eyes to his iconic hat. Let’s break down how you can bring these features to life in your drawing.
Eyes And Eyebrows
The eyes are where Woody’s personality truly shines. Start by drawing two oval shapes for his eyes, ensuring they are slightly angled to give him that friendly yet mischievous look. Inside each oval, add a smaller circle for his pupils, leaving a tiny white spot to indicate light reflection.
Woody’s eyebrows are thick and arched, contributing to his expressive nature. Use bold, curved lines above each eye to create them. Adjust the angle of the eyebrows to convey different emotions—raising one eyebrow can give Woody a curious look, while angling both upwards can make him appear surprised.
Nose And Mouth
Woody’s nose is simple yet distinct. Draw a small, curved line just below the eyes to represent it. Keep it subtle to maintain his cartoonish appearance.
His mouth is always ready to smile or talk. Sketch a wide, curved line for his smile, and add a slight dip in the middle to capture his friendly grin. You can add small lines at the corners to emphasize his cheerful demeanor. Want to depict him speaking? Slightly open the line and add a small curve for his tongue.
Adding The Hat
Woody’s hat is iconic and completes his look. Begin by drawing the hat’s brim, a wide oval shape that sits just above his eyebrows. Ensure the brim curves downward slightly to wrap around his head.
Next, sketch the top of the hat, a dome-like shape that rises from the brim. Adding small details like stitching lines can enhance realism. Imagine Woody tipping his hat to you as a sign of his friendly nature—how can you capture that gesture in your drawing?
These details can transform your Woody drawing from ordinary to extraordinary, allowing you to explore his charismatic character. Are you ready to bring Woody to life on paper?

Credit: www.youtube.com
Drawing The Outfit
Drawing Woody’s outfit brings his cowboy charm to life. Each piece of clothing adds to his unique style. Capture the essence of his character by focusing on the details of his shirt, vest, badge, belt, and jeans. These elements make Woody the iconic figure we all know and love.
Cowboy Shirt Details
Woody’s shirt has a classic western look with a yellow base. Add red lines to create a checkered pattern. Make sure the lines are evenly spaced. His shirt has a collar that folds down. Draw it carefully to give the shirt a realistic touch. Woody’s sleeves are long, so extend them to the wrists. Buttons are small and round, placed down the center of the shirt. Pay attention to these details for accuracy.
Vest And Badge
The vest is black and white with cow patterns. Draw random spots to mimic the cowhide look. The vest sits over the shirt snugly. Woody’s sheriff badge is a key detail. It’s a shiny gold star pinned to the vest. Draw the badge prominently on the left side. Make sure the star has pointed edges and a shiny finish.
Belt And Jeans
Woody’s belt is wide and brown. It has a large buckle in the center. Draw the buckle as a metallic oval. His jeans are deep blue and fitted. They have a simple design without extra pockets. Add stitching lines to give the jeans a rugged look. The cuffs should be straight and fall over his boots.
Adding Arms And Hands
Sketch Woody’s arms with long curves for a lively pose. Add fingers to his hands for a realistic touch.
Adding arms and hands to your drawing of Woody from Toy Story is a crucial step in bringing the character to life. His arms, with distinct cowboy sleeves and hands ready to tip his hat, add charm and character. Getting these details right will give your drawing a dynamic and authentic look.Drawing The Sleeves
Start by drawing the sleeves that are an essential part of Woody’s cowboy outfit. His sleeves are slightly puffed at the shoulders, so make sure to illustrate that slight bulge. This puffiness is followed by a narrower section that leads into his cuffs. Add vertical lines to create a plaid pattern, capturing the iconic cowboy style. Remember, these lines should be subtle enough to suggest a pattern without overpowering the sleeve’s shape. Have you ever noticed how a simple pattern can elevate a character’s authenticity?Sketching The Hands
Woody’s hands are expressive, often shown in mid-action, whether he’s reaching for his hat or gesturing animatedly. Begin with a basic mitten shape to form the hand’s outline. This shape will help you position the fingers accurately. Divide the mitten into five segments, gently curving them to create individual fingers. Focus on the thumb’s placement, which is crucial for a natural look. Are you capturing Woody’s lively spirit through his hands’ gestures? Once you have the basic structure, add details like knuckles and the subtle wrinkles that suggest movement. These small touches make your drawing feel alive. How often do we overlook the power of such tiny details in bringing our art to life? Engage with the process, and don’t hesitate to adjust your lines for a more natural flow. Drawing is as much about the journey as it is about the result. Happy sketching!Creating The Legs And Boots
Begin with Woody’s distinctive boots. Draw rounded shapes for the boots, adding small details for the spurs. Sketch straight lines for legs, capturing the cowboy’s casual stance. Keep proportions accurate to maintain Woody’s characteristic look.
Creating Woody’s legs and boots adds life to your drawing. His cowboy style is iconic, and capturing it is essential. Start by sketching the legs with precision. Pay attention to the boots’ unique details. These elements bring Woody’s character to life. Let’s explore how to create them step by step.Drawing The Legs
Woody’s legs are slender and slightly bent. Draw two straight lines for the thighs. They should be parallel and evenly spaced. Connect them with curved lines for the knees. Add the calves with gentle curves. His legs should appear slightly angled. This gives him a natural stance. Balance the proportions for realism.Details Of The Boots
Woody’s boots are distinctive with pointed toes. Begin by sketching a rounded rectangle for the base. Add a triangle at the front for the pointed toe. The heel is slightly raised. Draw a small block for the heel. Include decorative stitching on the boots. This enhances authenticity. Consider adding spurs for a cowboy look. Make sure the boots appear sturdy and well-fitted.Refining And Detailing
Refining and detailing are crucial in capturing Woody’s charm. Begin with a clear outline. A well-defined sketch sets the foundation. Focus on areas that need more depth. This stage enhances the drawing’s personality.
Enhancing The Features
Enhance Woody’s facial expression. His eyes are wide and welcoming. Draw them larger for impact. Add his signature, confident smile. It’s slightly off-center. Refine the cowboy hat. Make sure it sits snugly. Adjust the brim’s curve for realism.
Detail his clothing. His checkered shirt is iconic. Use light lines for the pattern. Ensure the pattern’s consistency. Focus on the vest’s texture. It’s leather and worn. Add subtle lines for a rugged look. Highlight the Sheriff’s badge. It should shine without overpowering.
Adding Final Touches
Examine the drawing for minor adjustments. Check proportions carefully. Ensure his boots and spurs align. Refine the hands for accuracy. Woody’s fingers are slender and expressive.
Apply shading for depth. Lightly shade under the hat’s brim. This adds dimension. Use subtle shadows on the face. They emphasize his prominent features. Add highlights to his eyes. This brings life to the character.
Finish with a clean outline. Erase any stray marks. Ensure lines are crisp and intentional. This final touch enhances the overall presentation.

Credit: www.youtube.com
Coloring Woody
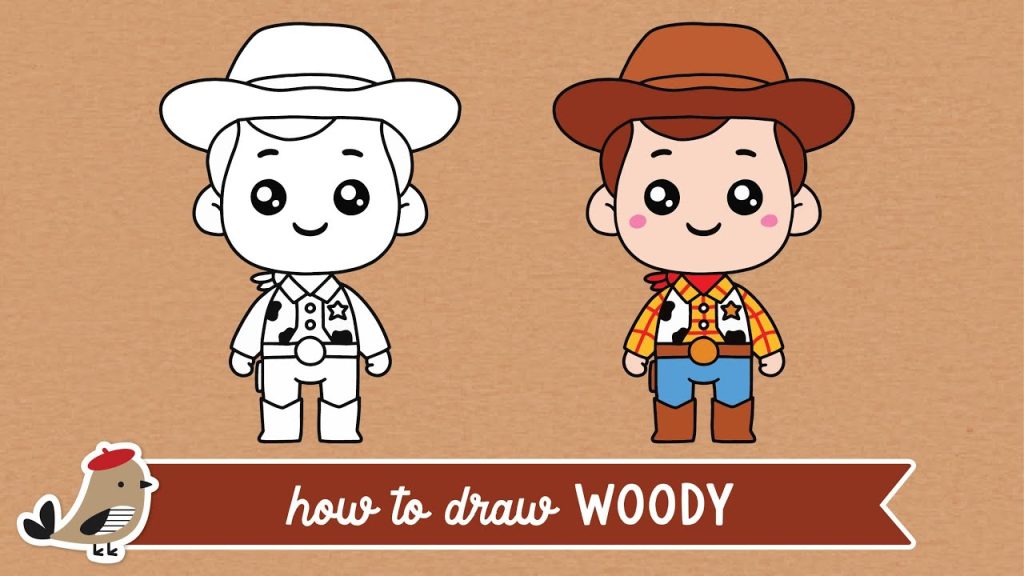
Learn to draw Woody from Toy Story with simple steps. Begin with basic shapes and add details. Finish by coloring his cowboy attire.
Coloring Woody from Toy Story brings the character to life. Use vibrant colors to capture his playful spirit. Focus on the details to make Woody look authentic and lively.Selecting Colors
Choosing the right colors is crucial. Woody’s hat is a rich brown. His shirt is a bright yellow with red lines. The vest is black and white. His pants are blue jeans, and boots are deep brown. Use these colors to stay true to the original design.Applying Color Techniques
Apply colors evenly for a smooth finish. Use light strokes for shading. Blend colors for realistic effects. To highlight Woody’s features, use darker shades for shadows. Soft colors enhance his friendly appearance. Pay attention to small details like his belt and sheriff badge. They add depth to the drawing. Following these techniques will make Woody look vibrant and dynamic. Your drawing will capture the essence of the beloved Toy Story character.Frequently Asked Questions
How Do I Start Drawing Woody?
Begin with basic shapes to outline Woody’s head, body, and limbs. Use a pencil for easy adjustments. Start detailing his iconic cowboy hat and facial features. Gradually add in details like his shirt pattern and cowboy boots. Remember, light strokes help in making modifications as you refine your drawing.
What Materials Do I Need To Draw Woody?
To draw Woody, you’ll need paper, a pencil, eraser, and colored pencils or markers. A ruler can help with proportions, while a reference image ensures accuracy. Optional tools include fine liners for outlining and blending stumps for shading. These materials help in creating a detailed and vibrant drawing.
How Can I Make Woody’s Face Look Realistic?
Focus on Woody’s eyes, nose, and smile for realism. Start with light sketches for placement. Pay attention to his eye shape and eyebrows. Use shading to create depth and highlights for a more lifelike appearance. Practicing these features will enhance Woody’s character and bring him to life.
What Are Common Mistakes When Drawing Woody?
Common mistakes include incorrect proportions and neglecting details. Ensure Woody’s hat, boots, and facial features are accurately sized. Avoid over-darkening outlines which can make the drawing look harsh. Overlooking details like his sheriff badge or shirt pattern can also affect authenticity.
Regular practice can help correct these issues.
Conclusion
Drawing Woody from Toy Story is a fun challenge. With practice, you can capture his unique charm. Start with basic shapes and add details slowly. Don’t rush; enjoy the process. Each attempt improves your skills. Remember, art is personal. Your Woody drawing will be unique, just like you.
Share your creation with friends and family. They might love it! Keep drawing and exploring your creativity. Art is a journey, not a destination. You might discover new techniques along the way. Have fun and keep sketching your favorite characters.