Imagine holding a plush toy that you designed yourself, crafted with love and stitched perfectly by your own hands. It’s not just a soft companion; it’s a piece of art you brought to life.
You might think creating a plush toy pattern is complex, but it’s simpler than you imagine. In this guide, you’ll discover how to make a plush toy pattern that reflects your creativity and personal style. You’ll learn the easy steps to transform your ideas into cuddly creations, and experience the joy of watching your vision take shape.
Whether you’re a beginner or a seasoned crafter, this process will spark your imagination and ignite your passion. Ready to dive in and unlock your creative potential? Keep reading and see how you can turn fabric and thread into a delightful masterpiece.

Credit: scratchandstitch.com
Choosing Materials
Selecting the right fabric is crucial for plush toy patterns. Soft, durable materials like cotton or fleece work well. Consider colors and textures that match your design, ensuring comfort and appeal.
Choosing the right materials is crucial in making a plush toy pattern. The materials you select will influence the toy’s appearance, feel, and durability. It’s important to consider both the fabric and stuffing, along with some additional supplies. This guide will help you make informed choices, ensuring your plush toy is cuddly and long-lasting.Fabric Selection
The fabric determines the plush toy’s texture. Cotton is a popular choice. It’s soft and easy to sew. Fleece offers warmth and a cozy feel. It’s perfect for winter-themed toys. For a luxurious touch, consider using minky fabric. It’s plush and velvety, ideal for baby toys. Always choose a fabric that’s safe and non-toxic, especially for children’s toys.Stuffing Options
Stuffing gives the toy its shape. Polyester fiberfill is a common option. It’s lightweight and washable. Wool stuffing provides a natural option. It offers a firm texture. Cotton stuffing is soft but less resilient. You can also use recycled materials for an eco-friendly choice. Test different stuffing types to find your preferred firmness and feel.Additional Supplies
You’ll need several supplies for crafting. Sewing needles and threads are essential. Match your thread to the fabric color for a neat finish. Scissors should be sharp for precise cuts. Pins help hold fabric pieces in place. A fabric marker can outline patterns. Safety eyes and noses add character. For a unique touch, consider embellishments like buttons or ribbons. Always ensure extra supplies are safe for children.Designing The Toy
Designing a plush toy is an exciting and creative process. It begins with imagining the toy’s personality and appearance. A well-thought design is crucial for making a pattern that comes to life. This stage involves sketching, refining ideas, and deciding on details that make your toy unique.
Concept Sketching
Start by sketching your toy’s concept on paper. Think about the toy’s character. Is it playful, shy, or brave? Draw simple shapes that represent the toy’s body, arms, and legs. Focus on capturing its essence. Use pencils to adjust lines and proportions easily. Sketch multiple views to understand its three-dimensional form. Consider the toy’s features, like eyes and mouth, and how they will be placed.
Finalizing The Design
With your sketches ready, it’s time to finalize the design. Choose the best version from your sketches. Refine the details and ensure they are clear. Decide on the toy’s size and proportions. Make sure the design is practical for sewing. Think about the fabric’s texture and how it will affect the toy’s appearance. Create a clean, definitive sketch that will guide your pattern making.
Creating The Pattern
Designing a plush toy pattern involves sketching your toy idea on paper. Cut out the shapes for each part. Match fabric pieces to the pattern, and sew them together for a cuddly creation.
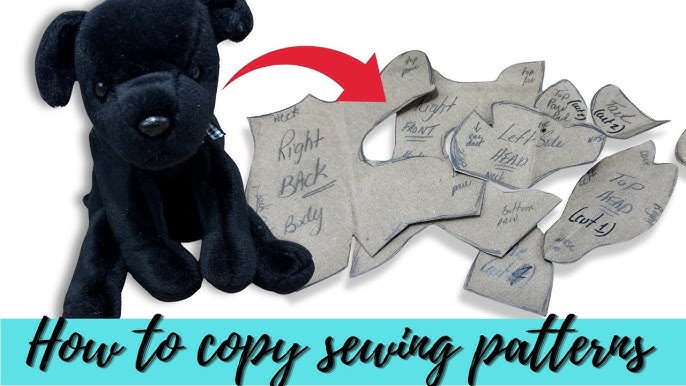
Creating a pattern for your plush toy is where the magic begins. It’s the blueprint that shapes your creativity into a tangible form. Crafting this pattern might seem daunting at first, but breaking it down into manageable steps can make the process more enjoyable and rewarding.Drawing The Pattern Pieces
Begin by sketching your plush toy design on paper. Think about each component of your toy—arms, legs, body, and head. Draw each piece separately, ensuring to keep the proportions realistic. Use a pencil and eraser so you can easily make adjustments. Don’t worry about perfection at this stage; it’s all about getting your ideas down. Remember, a simple and clear design is easier to work with.Adding Seam Allowances
Seam allowances are crucial for sewing your pieces together. Add an extra margin around each pattern piece, typically about 1/4 to 1/2 inch. This space ensures that your toy holds together well once sewn. Mark these allowances clearly on the pattern. This step is often overlooked by beginners, leading to plush toys that don’t quite fit together. Double-check your work to avoid this common pitfall.Labeling The Pieces
Label each pattern piece to avoid confusion during assembly. Indicate which part of the toy it corresponds to, such as “left arm” or “head”. Include any important details like “cut two” or “on the fold” directly on the pattern. This guidance is incredibly helpful when cutting fabric later. Why not add a personal touch by naming each piece? It might sound silly, but it adds a layer of fun to the process. Creating a plush toy pattern is an exciting journey of creativity and precision. As you draw, add seam allowances, and label your pieces, remember that each step brings you closer to your finished creation. What unique design will you bring to life next?Cutting The Fabric
Cutting the fabric is crucial for creating a plush toy pattern. Use sharp scissors for clean edges. Follow the pattern carefully, ensuring each piece aligns perfectly.
Creating a plush toy is a delightful process, and cutting the fabric is a crucial step that requires precision and care. Imagine the excitement as your vision begins to take shape with each snip of the scissors. The accuracy of your cuts will determine the final form and quality of your plush toy, making this an essential part of your crafting journey.Transferring The Pattern
Begin by laying your fabric flat on a clean, even surface. Using a washable fabric marker or tailor’s chalk, carefully trace the pattern pieces onto the fabric. Ensure you leave space around each piece for seam allowances—this extra fabric ensures that your plush toy can be sewn together securely. It’s helpful to pin the paper pattern to the fabric to prevent any shifting while you trace. This simple step can save you from minor misalignments that could affect the overall look of your toy.Cutting Techniques
Once the pattern is transferred, it’s time to cut the fabric. Use sharp fabric scissors to ensure clean, precise edges. Dull scissors can fray the fabric and lead to uneven lines, which might complicate sewing later. Consider cutting along the grain of the fabric for better durability and a professional finish. Have you ever noticed how some plush toys seem to hold their shape better? This is often the result of careful cutting along the fabric’s grain. If you’re working with a fabric that tends to shift, like fleece or minky, try using pattern weights instead of pins to hold the fabric in place. This small adjustment can make a big difference in maintaining the integrity of your pattern as you cut. Taking your time with these steps can transform your plush toy from an average creation into a treasured keepsake. How will you ensure precision in your next crafting project?Sewing The Toy
Creating a plush toy pattern involves sketching your design on paper. Cut out the fabric pieces based on the pattern. Sew the pieces together, stuffing the toy for shape and softness.
Sewing the toy is where creativity comes alive. This phase brings your plush toy pattern to life. Careful stitching and thoughtful assembly ensure durability and appeal. As you sew, each piece joins to form the cuddly toy you imagined.Stitching Techniques
Choose the right stitch for your fabric. A straight stitch is ideal for most plush toys. It’s simple and holds fabric firmly. For stretchy materials, use a zigzag stitch. It accommodates fabric movement without breaking. Backstitching secures seams and prevents unraveling. Always knot thread ends to keep stitches secure.Joining Pieces Together
Align fabric edges before sewing. Pin pieces to keep them in place. Sew along the marked lines for precision. Check alignment as you sew to avoid mismatched seams. Trim excess fabric for a neat finish. Iron seams flat for a polished look. This enhances the toy’s shape and appearance.Stuffing And Shaping
Stuffing and shaping bring plush toys to life. Fill your creation evenly to maintain its form. Shape with gentle pressure, adjusting to achieve the desired look and feel.
Stuffing and shaping are crucial steps in making plush toys. They give your creation life and personality. Proper stuffing ensures your toy is huggable and durable. Shaping adds character, making it unique and special. Let’s dive into these important steps.Filling The Toy
Choose the right stuffing for your plush toy. Polyester fiberfill is popular for its softness and ease of use. Alternative options include cotton, wool, or recycled materials. Fill the toy evenly to avoid lumps. Use small amounts of stuffing at a time. Push stuffing into corners and small areas with a pencil. This ensures every part of the toy is filled properly.Shaping Techniques
Shaping transforms your plush toy into a character. Start by distributing stuffing evenly. This helps maintain the toy’s form. Use your hands to mold the toy’s features. Pinch and shape the nose, ears, and limbs. Adjust the stuffing to create a balanced look. For detailed features, use extra stuffing. This highlights areas like cheeks or paws. Secure the shape by sewing edges tightly. Double-check the seams for durability.Finishing Touches
Ensure the plush toy pattern is perfect with precise measurements and clean lines. Add detailed features like eyes and stitching for character.
Finishing touches are the magical steps where your plush toy pattern truly comes to life. This is where you add the character and personality that make your creation unique. It’s the moment when your plush toy transforms from a simple piece of fabric into a beloved companion.Adding Details
Adding details can be the most fun part of creating a plush toy. Think about what makes your toy special. Is it the eyes that sparkle, a cute little nose, or maybe even a quirky tail? You can use embroidery threads, buttons, or fabric paint to create these features. If you’re making a cat, perhaps add some whiskers with black thread. For a teddy bear, sewing on a little bow tie can add charm and character. Don’t rush this step. Take your time and enjoy the process. These details are what your plush toy will be remembered by.Cleaning Up Edges
Cleaning up edges is crucial for a polished look. Loose threads or uneven edges can make your plush toy look unfinished. Use a small pair of scissors to trim any excess threads. Consider using a zigzag stitch to reinforce seams and prevent fraying. A neat edge ensures durability and makes your plush toy look professionally made. Remember, the little things matter. Would you feel proud gifting a plush toy that looks rough around the edges? Take a moment to inspect your work. This final touch reflects your effort and attention to detail.
Credit: www.pinterest.com
Testing And Adjustments
Testing and Adjustments Refine your plush toy pattern by making prototypes. Identify areas for improvement and tweak the design. Test the fit and style to ensure the final product is perfect. Adjustments help create a plush toy that matches your vision and is loved by all.
Creating a plush toy pattern involves a lot of creativity. Testing and adjustments are crucial steps in this process. They help ensure your plush toy turns out just right. This stage is where you refine and perfect your design. You need to check every detail. It’s about making sure the pattern works well before sewing it together.Checking For Flaws
Begin by examining your pattern closely. Look for any mistakes or irregular shapes. Ensure all parts fit together as intended. Sometimes, designs can have tiny flaws. These can affect the final product. Use a ruler to measure each piece. Compare them to your original design. This helps catch errors early.Making Corrections
Once you spot a flaw, it’s time to make corrections. Adjust the pattern pieces as needed. You may have to redraw some parts. Ensure all corrections maintain the toy’s proportions. Pin the pieces together to test the fit. This gives you a preview of the final shape. Adjust until everything aligns perfectly.Care And Maintenance
Crafting plush toy patterns involves thoughtful planning and care. Use durable materials and clear designs to ensure easy maintenance. Regular checks and gentle cleaning keep toys looking fresh and lasting longer.
Caring for and maintaining your handmade plush toy pattern ensures its longevity and keeps it looking fresh and cuddly. Whether it’s a precious gift or a creation of your own, knowing how to properly clean and repair your plush toy can keep it cherished for years. Let’s dive into some practical tips and advice to make this task simple and efficient.Cleaning Tips
Regular cleaning of your plush toy is essential to keep it free from dust and allergens. – Spot Cleaning: For minor stains, gently dab the area with a damp cloth and mild soap. Avoid soaking the toy, as excessive moisture can damage the fabric. – Machine Wash: If the toy is machine washable, place it in a mesh laundry bag to protect it during the cycle. Use a gentle detergent and select a delicate wash cycle with cold water. – Drying: Air drying is best for plush toys. Lay the toy flat on a clean towel and reshape it as it dries to maintain its original form. Avoid direct sunlight to prevent fading.Repair Advice
Even with the best care, plush toys might need repairs over time. – Loose Seams: If you notice any seams coming apart, use a needle and thread to sew them back together. A simple whip stitch is often enough to secure the seam. – Replacing Stuffing: Over time, stuffing can become lumpy or flat. Carefully open a seam, add or replace the stuffing, and sew it closed. Use polyester fiberfill for a soft and resilient feel. – Torn Fabric: For small tears, fabric glue can be a quick fix. For larger rips, patch the area with a matching fabric piece, sewing it securely in place. Have you ever wondered if your plush toy has a story of its own to tell? These care tips ensure it stays ready to share its journey with the next generation. Remember, the love and attention you give it today will make it a timeless treasure tomorrow.
Credit: www.pinterest.com
Frequently Asked Questions
What Materials Are Best For Plush Toys?
The best materials for plush toys are soft fabrics like fleece, minky, and cotton. These materials are durable, easy to work with, and safe for children. They also provide the plush toy with a cozy feel and appealing texture. Choose materials that are machine washable for easy cleaning.
How Do I Start Designing A Plush Toy Pattern?
Start by sketching your plush toy design on paper. Focus on the toy’s shape, size, and details. Use tracing paper to refine your patterns. Determine the seam allowances and fabric requirements. Consider creating a mock-up with scrap fabric to test the design before finalizing.
Can I Use A Sewing Machine For Plush Toys?
Yes, a sewing machine is ideal for making plush toys. It speeds up the sewing process and ensures sturdy seams. Use appropriate settings for the fabric type. A walking foot can help manage thicker fabrics. Manual hand sewing can complement machine stitching for detailed work.
What Are Common Mistakes In Plush Toy Patterns?
Common mistakes include incorrect seam allowances, uneven stitching, and poor fabric choices. Ensure your pattern pieces align properly. Double-check measurements and use suitable fabrics. Avoid overly complex designs for beginners. Practice patience and precision for a polished final product.
Conclusion
Creating a plush toy pattern is fun and rewarding. Start with a simple design. Gather your materials and tools. Sketch your pattern on paper. Cut the fabric carefully. Sew the pieces together with patience. Stuff the toy to your liking.
Add final touches like eyes and nose. Each step helps bring your plush toy to life. Practice makes perfect, so keep trying new designs. Share your creations with friends and family. Enjoy the process and creativity involved. Making plush toys can be a wonderful hobby.
Let your imagination soar and create adorable toys. Happy crafting!