How to Make a Toy Box: Step-by-Step Guide for Beginners
Have you ever felt that your child’s toys seem to multiply overnight, leaving your living room looking like a toy store after a tornado? If you’re nodding your head, you’re not alone.
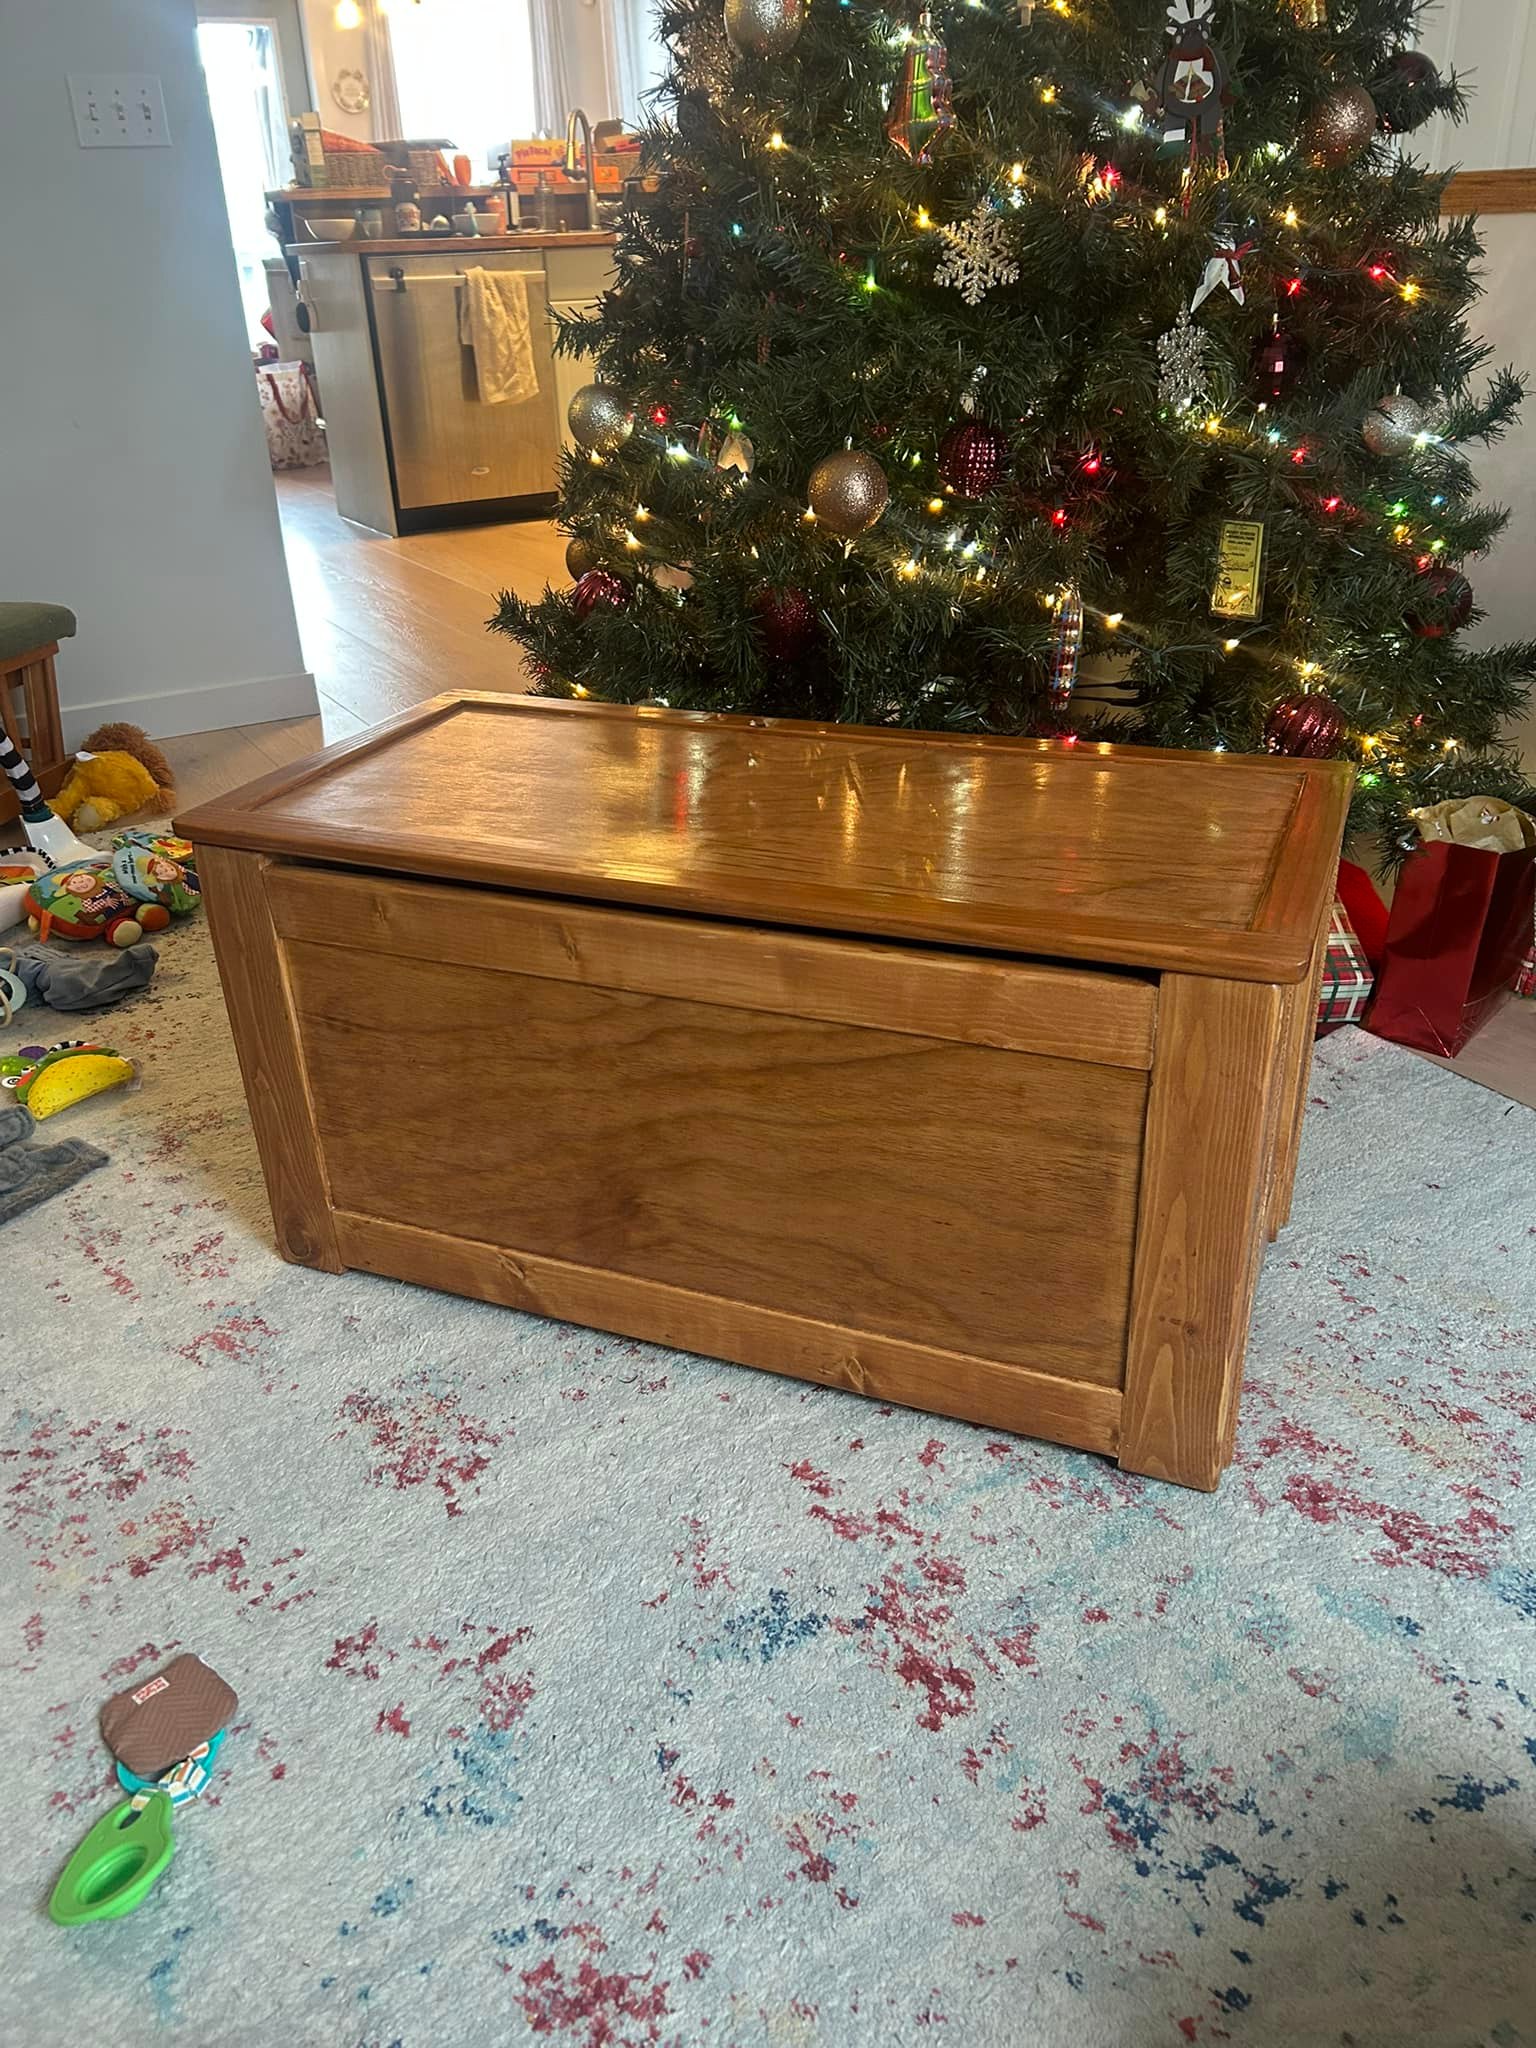
A toy box can be your secret weapon in organizing the chaos. Imagine having a dedicated space where every toy is neatly tucked away, making clean-up a breeze and freeing up your living space for family activities. Creating your own toy box isn’t just practical; it’s a fun and rewarding project that you can tailor to fit your style and needs.
Plus, knowing that you built it yourself gives you a sense of accomplishment every time you see it. Your DIY toy box can be as simple or as elaborate as you wish, and with a few basic tools and materials, you’re well on your way to creating a storage solution that keeps toys organized and out of sight. Curious about how you can make a toy box that’s both functional and stylish? Stick around, and let’s dive into the easy steps that will transform your home into a clutter-free haven.
Credit: www.facebook.com
Choosing Materials
Creating a toy box is not just about building a storage space; it’s about crafting a cherished piece that could last generations. The materials you choose play a crucial role in the durability and aesthetics of the toy box. Selecting the right materials can make your DIY project not only successful but also enjoyable.
Wood Options
Wood is a popular choice for toy boxes due to its strength and classic look. But which type should you choose? Pine is affordable and easy to work with, making it ideal for beginners. However, it can be prone to dents and scratches.
If you’re aiming for a more durable option, oak or maple might be your best bet. These hardwoods are more resistant to wear and tear. They come with a higher price tag but offer longevity that could be worth the investment. Have you ever considered using reclaimed wood? It’s a sustainable choice that adds character and a story to your project.
Hardware And Tools
Once you’ve selected your wood, it’s time to think about the hardware and tools you’ll need. Hinges and handles are essential components. Brass or stainless steel hinges add a touch of elegance while ensuring the lid operates smoothly. Soft-close hinges are a great choice if you want to prevent little fingers from getting pinched.
As for tools, a basic toolkit with a saw, drill, and screwdriver should suffice. If you already have a power drill, consider it your best friend in this project. It speeds up the process and ensures precision. Do you have a favorite tool that makes every project easier? Investing in quality tools can transform your crafting experience.
Choosing the right materials and tools is an integral part of the toy box-making journey. Each choice impacts the final product’s look, feel, and durability. What will you choose to make your toy box unique and lasting?

Credit: www.facebook.com
Designing The Toy Box
Designing a toy box involves choosing sturdy materials and simple tools. Customize the size and color to fit any space. Add personal touches like names or favorite characters for a special touch.
Designing the Toy Box Creating a toy box can be an exciting project that combines creativity with practicality. This step involves visualizing the final product and ensuring it meets both functional and aesthetic needs. Let’s delve into the key aspects of designing your ideal toy box.Measurements And Dimensions
Start by considering the space where the toy box will reside. Measure the area to ensure the box fits comfortably without obstructing movement. Think about the amount of toys you plan to store. Will it be a compact box for a small bedroom, or a larger piece for a playroom? Sketch out rough dimensions to visualize how it will look in the chosen space. This approach helps avoid surprises later on.Creating A Blueprint
Once you have your measurements, it’s time to create a detailed blueprint. You don’t need to be an architect to draw one—simple sketches with labeled dimensions will suffice. Use graph paper or a digital tool to keep lines straight and proportions accurate. This step acts as your roadmap, guiding you through the building process. Consider adding compartments or shelves in your design. These features add organization and make the toy box more versatile. Will the toy box have a lid, or will it be an open structure for easy access? A clear blueprint ensures you have a solid plan before you begin cutting and assembling materials.Cutting The Pieces
Creating a toy box involves precise cutting of wood pieces. This step is crucial for ensuring all components fit together perfectly. In this section, learn how to cut the pieces correctly.
Safety Precautions
Before starting, prioritize safety. Wear protective goggles to shield your eyes. Use gloves to keep your hands safe. Ensure your workspace is well-lit. Clear any debris or obstacles from the cutting area. Inspect the saw for any damage before use. Always maintain focus while operating the saw.
Using A Saw
A saw is essential for cutting wood. Choose the right type for your project. Circular saws are great for straight cuts. Jigsaws work well for curves. Measure the wood carefully before cutting. Mark lines with a pencil to guide your cuts. Keep a steady hand while guiding the saw along the line. Make slow and deliberate cuts to avoid mistakes. Check the cut pieces for accuracy and smoothness. Sand any rough edges to prevent splinters.
Assembling The Box
Assembling the box is where the magic truly begins. You’ve gathered your materials, and now it’s time to bring them to life by piecing them together into a functional and beautiful toy box. This process requires precision, patience, and a touch of creativity to ensure the box is not only sturdy but also appealing to the eyes.
Joining Techniques
Deciding how to join your pieces is crucial. Will you opt for screws or nails, or maybe try dowels for a cleaner look? Each technique has its advantages. Screws offer strength and are easy to adjust if mistakes happen. Nails can be quicker but might not hold as well over time.
Consider using a dowel joint for a seamless finish. If you’ve never tried it, now could be the perfect opportunity to learn a new skill. Picture your toy box with invisible joins, adding a touch of elegance.
Securing The Structure
Securing the structure is where you ensure your box stands the test of time. It’s one thing to assemble the pieces; it’s another to make them stay together. Are you confident your box won’t wobble or fall apart?
Consider reinforcing the corners with metal brackets for added durability. They’re easy to install and provide extra strength. Alternatively, wood glue can work wonders if applied correctly. It’s all about finding the balance between aesthetics and functionality.
Have you thought about the weight it needs to hold? A box that can withstand the chaos of a child’s playroom is worth the extra effort. Are you ready to take on the challenge?
Adding The Lid
Secure the lid to complete your toy box. Attach hinges to the back, ensuring smooth opening and closing. Consider adding handles for easy lifting.
Adding the lid to your toy box is a crucial step. It ensures everything is safely stored away. This part adds functionality and style to your creation. A well-designed lid can prevent dust and keep toys organized. Let’s dive into the essential aspects of adding the lid.Hinge Installation
Securely attaching the lid requires quality hinges. Choose durable hinges that match the box’s material. Measure the lid and box carefully before drilling. This ensures perfect alignment. Place the hinges evenly to distribute weight. Use a level to check for straightness. Secure the screws tightly to avoid wobbling. Test the lid to ensure smooth opening and closing.Safety Features
Safety is key in children’s furniture. Install soft-close hinges to prevent finger pinching. These hinges slow down the lid’s closure. Consider adding a lid stay. It holds the lid open at any angle. This prevents accidental slams. Round off sharp edges to avoid injuries. Use non-toxic materials for paint or varnish. Ensure all parts are securely fastened. Regularly check the lid’s stability. Keep the toy box safe for little ones.
Credit: www.facebook.com
Finishing Touches
Enhance your toy box with vibrant paint or decals for a playful look. Add soft padding inside to protect toys. Secure the lid with child-friendly hinges for safety and ease of use.
Finishing touches make your toy box special. This stage enhances its appearance and durability. It’s the final step where your creativity shines. With a few detailed steps, your toy box will look perfect.Sanding And Smoothing
Start by sanding the entire surface of the toy box. Use fine-grit sandpaper for smoothness. Ensure all edges and corners are rounded. This prevents any sharp spots. Wipe away dust using a damp cloth. This prepares the surface for the next steps.Painting Or Staining
Choose a paint or stain that suits your style. For vibrant colors, select non-toxic paints. Apply a primer first for better adhesion. Let it dry completely. Then, apply your chosen color in thin layers. Use a brush or roller for even coverage. If staining, select a shade that highlights the wood’s grain. Apply with a clean cloth. Allow each coat to dry before adding another. Finish with a protective sealant for durability. This will keep your toy box looking new longer.Decorating Ideas
Decorating your toy box is where creativity truly shines. It’s not just about storage—it’s a chance to transform a simple box into a piece of art that reflects personality and style. Whether you want to showcase your child’s favorite characters or match the decor of their room, the possibilities are endless. Let’s dive into some delightful decorating ideas!
Personalization Tips
Adding a personal touch can make your toy box extra special. Consider painting your child’s name or initials on the box. You can use stencils for a neat look or let your child create their own masterpiece with colorful paints. If painting isn’t your thing, you can opt for adhesive letters or decals.
Another great idea is to create a theme based on your child’s interests. Is your little one a fan of dinosaurs? Add some dinosaur stickers or paint dino footprints. Personalizing the toy box not only makes it unique but also encourages your child to keep their toys organized.
Creative Designs
Why stick to traditional designs when you can let your imagination run wild? Consider using fabric to cover the toy box for a chic look. Choose patterns that complement the room decor, such as stripes, polka dots, or even florals. With a staple gun and some fabric glue, you can achieve a polished finish.
Think outside the box with textures and materials. Metallic paints can give a futuristic vibe, while chalkboard paint allows for ever-changing designs—perfect for doodlers. You can even add 3D elements like toy wheels or buttons to create a playful aesthetic.
Have you thought about collaborating with your child on the design? It’s a fun project that can strengthen your bond and spark creativity. Plus, they’ll be proud to show off their handiwork.
Maintenance Tips
Maintaining your toy box is crucial to ensure it stays in good condition and continues to serve its purpose effectively. A well-maintained toy box not only keeps toys organized but also extends its lifespan. In this section, we’ll explore practical tips that will help you keep your toy box in top shape.
Cleaning The Toy Box
Regular cleaning is essential for a toy box, especially if it’s frequently used by children. Start by emptying the box completely. Use a damp cloth to wipe down the interior and exterior surfaces to remove dust and grime. If the toy box is made of wood, consider using a mild soap solution to clean stubborn spots.
Don’t forget about the corners where dirt tends to accumulate. For plastic toy boxes, a gentle scrub with a sponge can be effective. Ensure the toy box is dry before refilling it with toys to prevent mold or mildew.
Repairing Damages
Inspect the toy box regularly for any signs of damage. Look for loose hinges, cracked panels, or broken handles. Addressing these issues promptly can prevent further deterioration. If a hinge is loose, tighten it with a screwdriver.
For minor scratches on wooden boxes, you can use a wood filler to patch them up. Plastic toy boxes might require a special adhesive to mend cracks. Have you ever wondered how a little maintenance can make a big difference in preserving your belongings?
By keeping up with these maintenance tips, you ensure that your toy box remains a safe and functional storage solution for years to come.
Frequently Asked Questions
What Materials Do I Need For A Toy Box?
To make a toy box, gather plywood, screws, hinges, and paint. You’ll also need tools like a saw, drill, and screwdriver. Choose durable materials to ensure the toy box lasts. Consider adding decorative elements like decals or paint for personalization.
How Much Does It Cost To Build A Toy Box?
Building a toy box typically costs between $30 to $100. The price depends on the materials and tools you choose. Using reclaimed wood or recycled materials can lower costs. Customization and design elements may increase the overall expense.
Can I Customize The Toy Box Design?
Yes, customizing your toy box design is possible. Add decals, paint, or carvings for personalization. Consider using stencils or stickers for a unique look. You can also adjust dimensions to fit specific spaces or needs. Customization adds character and makes it special.
How Long Does It Take To Make A Toy Box?
Making a toy box usually takes 4 to 6 hours. The time depends on your experience and design complexity. Simple designs are quicker to complete. Ensure you have all tools and materials ready beforehand to save time.
Conclusion
Creating a toy box is a rewarding DIY project. It adds charm to any room. Plus, it’s practical for storage. You only need basic tools and materials. Follow the steps carefully. Enjoy the process. Let your creativity shine. You can paint it any color.
Add unique designs if you like. This personal touch makes it special. Kids will love their new toy box. Plus, it keeps their toys organized. Try it out today. A fun and functional addition to your home!