How to Draw a Toy Bear: Step-by-Step Guide
Imagine the joy on a child’s face when they see a toy bear you’ve drawn just for them. Drawing a toy bear is not only a fun and creative activity but also a wonderful way to express love and care.
Whether you’re an aspiring artist or someone who just wants to try something new, learning to draw a toy bear can be both simple and rewarding. In this guide, we’ll walk you through easy steps to bring your adorable bear to life on paper.
You’ll discover tips and tricks that make the process enjoyable, even if you think you can’t draw a straight line! So grab your pencils, and let’s get started—your perfect toy bear is just a few strokes away.
Materials Needed
Gather pencils, erasers, and colored markers for sketching. Prepare paper for drawing and a ruler for straight lines.
Embarking on the journey to draw a toy bear can be an exciting and rewarding experience. However, before you start sketching, gathering the right materials is essential. The right tools can make a significant difference in your drawing process, ensuring your creativity flows smoothly onto the paper.Essential Drawing Tools
To begin, you’ll need a good set of pencils. A range of pencil grades from HB to 6B will help you create various shades and depths in your bear drawing. A reliable eraser is also crucial for refining your lines and correcting mistakes.Paper Selection
Choosing the right paper is just as important. Opt for a medium-weight sketch paper that can handle both light sketching and heavier shading. This type of paper provides a sturdy surface that enhances the texture of your drawing.Coloring Supplies
If you plan to add color to your toy bear, colored pencils or markers are excellent choices. They offer precise control and a wide range of colors to bring your bear to life. Consider using a color palette that complements the soft and cuddly nature of a toy bear.Additional Accessories
A ruler might be handy for ensuring proportions and symmetry in your drawing. It’s surprising how often a simple ruler can help achieve the perfect look. Also, consider a blending stump to smooth out pencil lines and create softer transitions.Workspace Setup
Creating a comfortable workspace is often overlooked but crucial. Ensure you have ample lighting and a clean, flat surface to work on. This will help maintain your focus and keep your drawing free from smudges or distractions. Have you ever noticed how the right materials can make or break your artistic endeavors? Investing in good quality supplies not only enhances the quality of your drawing but also boosts your confidence and enjoyment in the process.Basic Shapes And Proportions
Embarking on the journey of drawing a toy bear begins with understanding the basic shapes and proportions. It’s like laying the foundation of a house; without a solid start, the final masterpiece may not hold up. By focusing on simple geometric shapes, you can create a bear that looks adorable and lifelike.
Drawing The Head
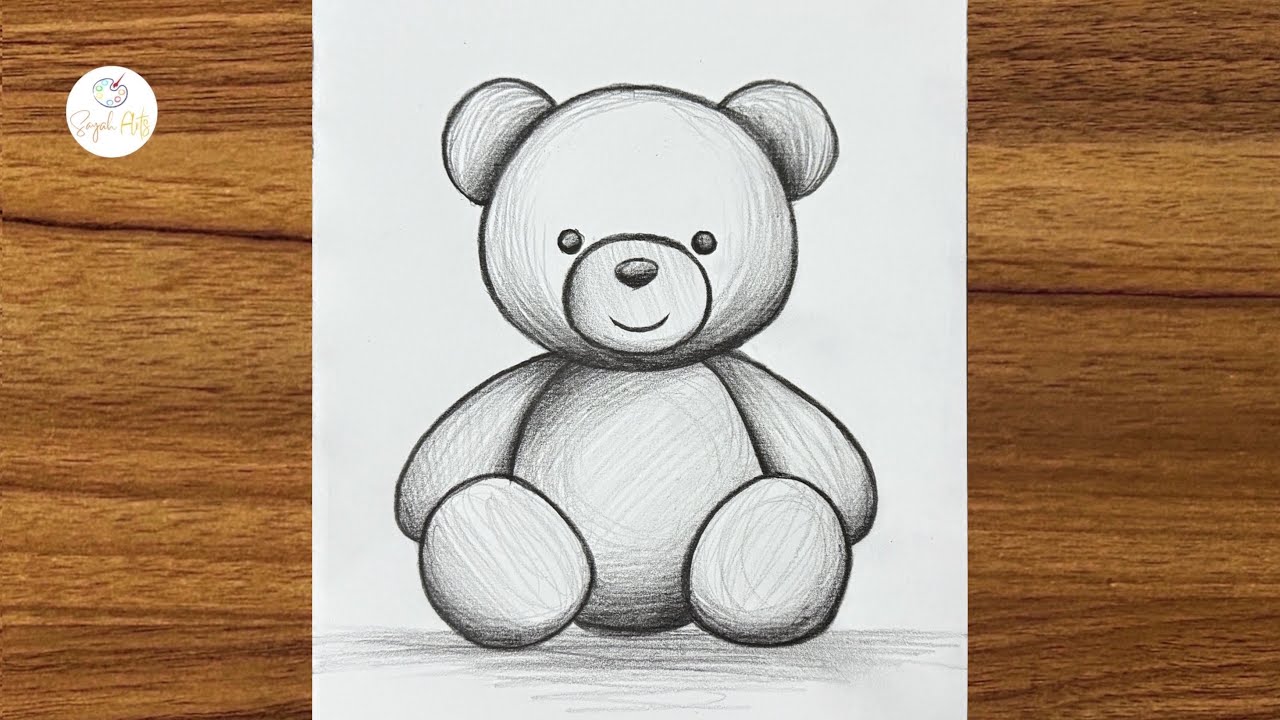
Start with a large circle to form the head. This circle will serve as the canvas for the bear’s face. Think about the size relative to the body; a slightly larger head often makes the bear appear more playful and cute.
Within the circle, add smaller circles or ovals for the eyes and ears. The eyes should be positioned symmetrically to give balance. Adding tiny circles for the pupils can bring your bear to life, giving it a curious expression.
Sketching The Body
Once the head is in place, sketch an oval or rounded rectangle beneath it for the body. The body should be proportionate to the head, not too big or small. Imagine how the bear will sit or stand, as this will guide the shape you choose.
Consider adding a light line in the center of the body to guide your drawing of the belly and chest. This line will help keep everything symmetrical and balanced.
Adding The Limbs
For the limbs, use elongated ovals or rectangles. The arms should be positioned just below the head, with the legs extending from the bottom of the body. Picture the bear in a playful pose, perhaps holding a toy or reaching out.
Adding curves to the limbs can make them look softer and more plush, enhancing the toy-like quality. Pay attention to the size of the limbs in relation to the body, ensuring they complement the bear’s overall look.
As you practice these techniques, you’ll find your toy bear taking shape with character and charm. Remember, drawing is all about enjoying the process and learning along the way. What’s your favorite part about creating art?
Refining The Outline
Refining the outline helps create a clear path for drawing a toy bear. Focus on basic shapes and proportions to ensure accuracy. This step simplifies the process, making it easier to add details later.
Refining the outline of your toy bear drawing is where the magic truly begins. It’s the stage where your sketch transforms from simple shapes into a recognizable character. This process involves paying close attention to details and ensuring every line contributes to the bear’s personality. Taking the time to refine your outline can make the difference between a flat drawing and one that feels alive and engaging.Defining The Features
Start by focusing on the toy bear’s face. The eyes, nose, and mouth are critical in conveying emotion. Consider what you want your bear to express—joy, curiosity, or perhaps a gentle calm. Ensure the eyes are symmetrical and well-aligned, as they are the focal point. You might recall how a slight tilt in the eyes or an upturned smile gave life to a previous drawing. This subtlety can dramatically alter your bear’s expression. Move on to the ears and paws. These features can add charm and individuality. Are the ears rounded and plush, or are they a bit floppy? Each choice contributes to your bear’s character.Smoothing The Lines
Once you’ve defined the features, it’s time to smooth the lines. Start by erasing any unnecessary guidelines or overlapping lines. This helps to clean up the drawing and make it more professional. Use a steady hand to trace over your final lines with a darker pencil or pen. This makes the outline bold and clear. Remember how much more polished your previous drawings looked after this step? If you find any lines too rigid, gently curve them to add softness. This technique can enhance the toy-like quality of your bear, making it more approachable and cuddly. As you refine, keep stepping back to view your bear from different angles. Does it still hold the charm you initially envisioned? Adjust as needed to maintain that captivating essence.
Credit: www.youtube.com
Adding Details
Begin by adding facial features like eyes, nose, and mouth to bring the toy bear to life. Sketch fine details, such as fur texture and clothing, to enhance realism and character.
Adding details to your toy bear drawing transforms it from a simple outline into a captivating character. These details breathe life into your creation, giving it personality and charm. As you refine your bear, focus on aspects like the eyes, nose, mouth, ears, and fur texture. Each feature contributes to the overall expression and feel of your drawing.Eyes And Nose
Begin with the eyes, which are the windows to your bear’s soul. Decide whether you want large, round eyes for a cute look or smaller, bead-like eyes for something more realistic. Place them symmetrically to maintain balance. For the nose, a small oval or triangle at the center of the face works well. Darken it with a gentle shading technique. The nose sets the mood, so consider if your bear is cheerful, curious, or bashful.Mouth And Ears
Draw a simple curve for the mouth to give your bear a friendly expression. You might add a slight upward curve at the ends for a smile. If you’re aiming for a sad or neutral expression, adjust the curve accordingly. Position the ears on the sides of the head, slightly above the eyes. Rounded ears are typical, but experimenting with size and shape can make your bear unique. Are the ears perky and alert, or are they drooping and relaxed?Fur Texture
Adding texture to the fur is where your drawing truly comes to life. Use short, quick strokes to mimic the softness of a toy bear. Vary the direction of your strokes to suggest movement and fluffiness. Consider the light source when shading the fur. Areas in shadow should be darker, while those in light should remain light. This contrast adds depth and realism. As you detail your bear, remember that each line and shade contributes to its story. What does your bear’s expression say? Is it a comforting friend or a mischievous playmate? Let these details guide your artistic choices and enjoy the creative process.Shading Techniques
Mastering shading techniques can elevate your toy bear drawing from flat to fabulously lifelike. Shading breathes life into your illustration, giving it dimension and character. But how do you effectively shade a toy bear, capturing its cuddly essence?
Light And Shadow
The dance between light and shadow is crucial for realistic shading. Consider where your light source is coming from. Is it a bright overhead light or a soft side lamp?
Identify the areas on your bear where the light hits directly; these will be your highlights. Use a lighter touch with your pencil or a softer shade to represent these bright areas.
Conversely, look for the parts that are away from the light source; these become your shadows. Apply more pressure with your pencil or choose a darker shade to emphasize these shadowed sections.
Experiment with the angle of your light source. You might be surprised how shifting it can drastically change the mood of your drawing.
Creating Depth
Depth is what makes your toy bear appear three-dimensional. To achieve this, use varying shading techniques.
- Cross-hatching: Draw intersecting lines to build up shadow areas.
- Stippling: Use small dots to create texture and depth.
- Blending: Smooth out pencil strokes using a blending stump or your finger for soft transitions.
Reflect on the texture of the bear’s fur. Is it smooth or fluffy? Use your shading to replicate this texture, adding realism to your drawing.
Don’t shy away from contrast. Bold differences between light and dark areas can make your bear pop off the page. What elements of your toy bear can you emphasize with contrast?
Remember, practice makes perfect. The more you experiment with these shading techniques, the more confident you’ll become in bringing your toy bear to life.

Credit: www.youtube.com
Coloring The Toy Bear
Begin by sketching a simple oval shape for the bear’s body. Add circles for the head and ears, and small ovals for the paws. Enhance your drawing with detailed features like eyes, nose, and a smile to bring your toy bear to life.
Coloring the Toy Bear is a delightful part of the drawing process. It brings your toy bear sketch to life with vibrant hues. The right choice of colors can add personality and charm to your creation. Let’s explore how to select and apply colors to your toy bear effectively.Choosing Colors
Selecting the right colors is crucial for your toy bear. Start by considering the mood you want. Warm colors like brown and orange give a cozy feel. Cool colors like blue and grey add a calm vibe. Think about the bear’s personality. A playful bear might suit bright colors. A cuddly bear may need soft pastels. Use a color palette that complements your vision. Experiment with different shades to find what works best. You can mix colors to create unique blends. This will make your bear stand out.Applying Color Evenly
Even color application is key to a polished look. Begin by using light strokes for a smooth base. Gradually build up layers for depth. Keep your hand steady to avoid uneven patches. Rotate your paper to reach tricky areas. Use quality colored pencils or markers for vibrant results. Blend colors gently to avoid harsh lines. Maintain consistent pressure for uniform shading. Work on one section at a time. This ensures neat and tidy coloring. Remember, patience is essential for a flawless finish.Final Touches
Add gentle shading for depth in your toy bear drawing. Highlight key features like eyes and nose for realism. Finish with soft lines to enhance the bear’s fluffy texture.
Adding the final touches to your toy bear drawing is like adding icing to a cake—it brings everything together and makes your creation truly stand out. This stage is all about enhancing details, correcting any errors, and ensuring your bear looks as charming as you envisioned. As you near the finish line, focus on these crucial aspects to elevate your drawing from good to great.Highlighting Key Areas
Using highlights can breathe life into your drawing. Consider where the light naturally hits your bear. Add subtle highlights on the bear’s cheeks, ears, and the tips of its paws. A simple white gel pen or a light-colored pencil can do wonders. Gently apply these highlights, making sure not to overdo it. A few well-placed highlights can make your toy bear appear more three-dimensional and engaging.Correcting Mistakes
Mistakes happen, even to the best artists. But they don’t have to ruin your artwork. Keep a soft eraser handy to gently remove any unwanted lines or smudges. If you find that some parts of your drawing look off, take a step back and assess. Sometimes, flipping the paper upside down can give you a fresh perspective. Adjust proportions if needed, ensuring each part of the bear looks balanced and harmonious. Remember, drawing is a process, and correcting mistakes is a part of it. What techniques do you use to refine your artwork? Embrace these final touches as an opportunity to learn and grow as an artist.
Credit: www.youtube.com
Frequently Asked Questions
How Do I Start Drawing A Toy Bear?
Begin by sketching basic shapes to outline the bear’s form. Use circles for the head and body. This helps in visualizing the overall structure. Once satisfied with the shape, refine the details like the face, ears, and limbs to add character to your toy bear.
What Materials Do I Need To Draw A Toy Bear?
You need paper, pencils, an eraser, and colored pencils or markers. Start with a pencil to outline and sketch. Use the eraser for corrections. Finally, use colored pencils or markers to add color and bring your toy bear to life.
How Can I Make My Toy Bear Drawing Realistic?
Focus on details like the texture of the fur and facial expressions. Use shading techniques to add depth and dimension. Pay attention to light and shadows to create a more lifelike appearance. Practice different techniques to enhance realism in your toy bear drawing.
What Are Common Mistakes In Drawing Toy Bears?
Common mistakes include disproportionate features and incorrect placement of limbs. Ensure the bear’s features are symmetrical and proportional. Pay attention to the positioning of the eyes, nose, and mouth. Regularly step back to view your drawing from a distance for better accuracy.
Conclusion
Drawing a toy bear can be fun and easy. You learned simple steps to create your bear. Practice helps you get better. Use your imagination and try new styles. Experiment with colors to make it unique. Share your drawings with friends and family.
Enjoy the process and keep drawing. Drawing improves your skills and creativity. Each drawing tells a story. Start with your ideas and see them come to life. Remember, art is personal and special. Your toy bear is a reflection of your creativity.
Keep exploring and enjoy every moment.