Ever looked at a toy bear and thought, “I could make that”? You’re in the right place.
Making your own toy bear is not only a fun project, but it also gives you a sense of pride every time you see it. Imagine having a cute, cuddly bear that you crafted with your own hands. This article will guide you step-by-step, ensuring your toy bear turns out just the way you envisioned.
You’ll discover simple techniques and tips to make the process easy and enjoyable. So, grab your materials and let’s dive into the world of toy bear making. With the right guidance, you’ll be amazed at what you can create. Keep reading, and soon you’ll be showing off your handmade treasure.
Materials Needed
Soft fabric, needle and thread, stuffing, buttons, and scissors are essential for crafting a toy bear. Choose fabric colors that suit your design.
Creating a toy bear can be a delightful and rewarding experience, especially when you see the joy it brings to a child’s face. To get started on this fun project, gathering the right materials is crucial. The right materials not only make the process smoother but also ensure the final product is both durable and cuddly. Here’s a detailed list of what you’ll need to craft your very own toy bear.
Fabric
Choosing the fabric is one of the most exciting parts. Soft plush fabric is ideal for a cuddly bear. You might opt for classic brown, or perhaps a fun color like pastel pink or blue. If you’re feeling adventurous, consider using patterned fabric for a unique look.
Stuffing
For that perfect huggable texture, polyester fiberfill is a popular choice. It’s lightweight and gives the bear a fluffy feel. Some people even recycle old pillows or stuffed animals for an eco-friendly option.
Thread And Needle
A strong, durable thread in a color that matches your fabric is essential. A basic sewing needle will work, but if you have a sewing machine, it will speed up the process. Remember, hand-stitching can add a personal touch and is great for small details.
Pattern
Having a pattern is like having a roadmap for your bear. You can find free patterns online or create your own if you’re feeling creative. A simple pattern ensures the bear comes together easily and looks proportionate.
Scissors
Sharp fabric scissors are a must for clean cuts. Dull scissors can fray the fabric and make sewing difficult. If you’re crafting with children, consider using safety scissors to avoid accidents.
Buttons Or Safety Eyes
These give your bear its personality. Buttons are classic, but safety eyes are a great option for younger children as they reduce choking hazards. You can even embroider eyes for a softer look.
Ribbon Or Decorative Accessories
A ribbon around the bear’s neck can add charm and character. You might also consider adding a small hat or a bow tie. These accessories can reflect the bear’s “personality” or match the recipient’s style.
Fabric Marker Or Tailor’s Chalk
These tools help you mark the fabric without leaving permanent marks. They’re perfect for outlining your pattern or adding small details. Tailor’s chalk washes out easily, making it ideal for temporary markings. Have you ever wondered how different materials can change the look and feel of a toy bear? Choosing wisely can make all the difference in the world. What materials will you choose for your personalized toy bear adventure?
Choosing Fabric
Selecting the right fabric is crucial for crafting a toy bear. Soft, durable materials like plush or fleece provide comfort and longevity. Choose colors and patterns that spark joy and creativity for a personalized touch.
Choosing the right fabric for your toy bear is a crucial step that can greatly affect its appearance, feel, and durability. The fabric you select not only determines the bear’s softness but also plays a role in how well it can withstand wear and tear. It’s an exciting part of the toy-making process, where your creativity and preferences come into play. Let’s explore the options available and what factors you should consider.
Types Of Fabric
- Fleece:Known for its softness and warmth, fleece is a popular choice. It’s easy to sew and can hide stitches well, making it ideal for beginners.
- Cotton:Lightweight and breathable, cotton offers a natural look. It’s versatile and can be found in various prints, perfect for a customized bear.
- Plush/Minky:Super soft and cuddly, plush or minky fabric creates an irresistibly huggable toy. It’s slightly more challenging to work with due to its stretchiness.
- Faux Fur:For a more realistic look, faux fur can be a great choice. It adds texture and character to the bear, though it requires careful handling and sewing.
Factors To Consider
- Durability:Consider how often the bear will be played with. If it’s for a child, sturdy fabrics like fleece and cotton are better choices.
- Ease of Sewing:If you’re new to sewing, fabrics like fleece or cotton are easier to handle. They don’t slip and slide as much as plush or faux fur.
- Appearance:Decide on the look you want. Do you prefer a traditional teddy bear look, or something more modern? Faux fur might give you that classic touch.
- Texture:How do you want the bear to feel? Soft and snuggly, or smooth and sleek? Your choice of fabric will greatly influence this.
Choosing the fabric is not just about the bear’s aesthetics or comfort. It’s also about reflecting your personality and the personality of the bear you envision. What kind of bear do you want to create? A playful friend or a sophisticated companion? Your fabric choice sets the foundation for this.
Creating The Pattern
Begin by sketching the toy bear’s outline on paper. Ensure the pattern includes the bear’s body, arms, legs, and head. Cut the pattern pieces carefully, ready for fabric tracing.
Creating the pattern for your toy bear is an exciting step that sets the foundation for bringing your cuddly creation to life. With a few simple tools and a bit of creativity, you can design a pattern that reflects your personal style and vision. Whether you’re a seasoned crafter or a beginner, this process is an adventure that invites you to unleash your inner artist.
Drawing The Bear Shape
Begin by grabbing a pencil and paper. Visualize the kind of bear you want to make. Is it a classic teddy bear or something more whimsical? Sketch an outline of your bear, focusing on its essential features like the head, body, arms, and legs. Aim for simplicity in your design, ensuring each part is proportional. Consider adding unique elements, like a heart-shaped nose or floppy ears. These touches can make your bear special and memorable.
Cutting The Pattern Pieces
Once you have your bear shape drawn, it’s time to transform your sketch into pattern pieces. Use tracing paper to copy each segment of the bear’s body. Carefully cut out these pieces, ensuring the lines are smooth and precise. If you have access to a photocopier, enlarging your pattern might provide a clearer outline. Label each piece to avoid confusion later. This step will save you time and effort when you start assembling your bear. As you cut, reflect on how each piece will contribute to the overall look of your bear. Are there any changes you’d like to make? Adjustments are easy at this stage. Creating the pattern is not just about precision; it’s about infusing personality into your bear. How will your pattern reflect your unique touch?

Credit: www.youtube.com
Cutting The Fabric
Creating a toy bear is a delightful craft project that brings a touch of whimsy to your day. One of the crucial stages is cutting the fabric, where precision meets creativity. This step sets the foundation for your bear’s shape and personality, so it’s important to approach it with care. Let’s dive into some specific tips to ensure your fabric cutting is accurate and efficient.
Aligning The Pattern
Begin by laying your fabric on a flat surface, ensuring it’s free from wrinkles. Smooth fabric leads to more accurate cuts. Place your bear pattern on top, aligning the edges carefully. Don’t rush; take your time to ensure every piece fits perfectly.
Consider using weights or pins to keep the pattern in place. This prevents any movement that might distort the shape. I’ve found that using pins at each corner works wonders in keeping everything stable.
Precision Cutting Tips
Sharp scissors are your best friends in this step. Dull blades can ruin your fabric and create jagged edges. A clean cut is crucial for a professional-looking toy bear.
When cutting, follow the pattern lines closely. Consider cutting slightly outside the lines to allow for seam allowance. This gives you a bit of extra fabric to work with, ensuring your bear’s seams are secure.
Have you ever tried cutting with a rotary cutter? It’s a game-changer for straight lines and quick cuts, especially if you’re working with multiple layers. Just ensure you’re using a cutting mat to protect your surfaces.
As you cut, think about the bear’s final appearance. Visualize each piece fitting together perfectly. How will these pieces transform into a cuddly friend?
Sewing The Pieces
Sewing the pieces of a toy bear brings the project to life. This step requires focus and patience. You are transforming fabric into a cuddly companion.
Stitching Techniques
Choose your stitching technique based on your skill level. Beginners may use a simple running stitch. This involves looping the needle through the fabric in a straight line. More advanced sewers might prefer backstitching. This technique creates a stronger seam. It involves stitching backward to fill gaps in the seam.
Ensure your stitches are tight and even. This keeps the stuffing inside. Use a thread that matches the fabric color. This hides the stitches and makes the bear look professional.
Joining The Parts
Once stitched, it’s time to join the parts of the bear. Begin with the body. Align the front and back pieces. Pin them together carefully. Sew around the edges, leaving a small gap.
This gap is for stuffing later. Next, attach the arms and legs. Position them on the body and pin securely. Sew them in place using a strong stitch. Finally, sew the head to the body. Make sure it is centered and secure.
Each piece fits together like a puzzle. Precision is key to a well-shaped bear. Your careful sewing will create a delightful toy bear.
Stuffing The Bear
Begin by gathering soft stuffing material to fill the bear evenly. Insert the stuffing gently through the opening, ensuring it reaches all corners and gives the bear a plump, cuddly shape.
Creating a toy bear is a delightful experience. Stuffing the bear is a crucial step that brings your creation to life. This process requires choosing the right materials and using effective techniques. The right stuffing ensures your bear is cuddly and huggable. Let’s explore the essentials of stuffing your bear.
Choosing The Right Stuffing
Selecting the ideal stuffing is vital for your bear’s softness. Polyester fiberfill is a popular choice. It’s lightweight and gives a plush feel. Natural cotton stuffing offers a more organic touch. It provides a soft, comforting texture. Consider eco-friendly options like recycled materials. They are sustainable and soft. Each type affects the bear’s feel and durability. Match the stuffing to your bear’s purpose. A decorative bear might need less stuffing. A child’s toy bear needs more for durability.
Filling Techniques
Proper filling techniques ensure even distribution. Start by stuffing the limbs first. Fill them firmly but not too tight. This helps the bear keep its shape. Gradually fill the body, adjusting density as needed. Use small amounts of stuffing at a time. This prevents uneven lumps. For a professional finish, use a stuffing tool. A wooden dowel can help reach tricky spots. Check the bear’s shape as you fill. Adjust to create a balanced look. Aim for a snug but not rigid feel.
Sewing The Seams
Creating a toy bear involves cutting fabric, sewing seams, and stuffing it. Choose soft materials for comfort. Carefully sew each piece to craft a cuddly companion.
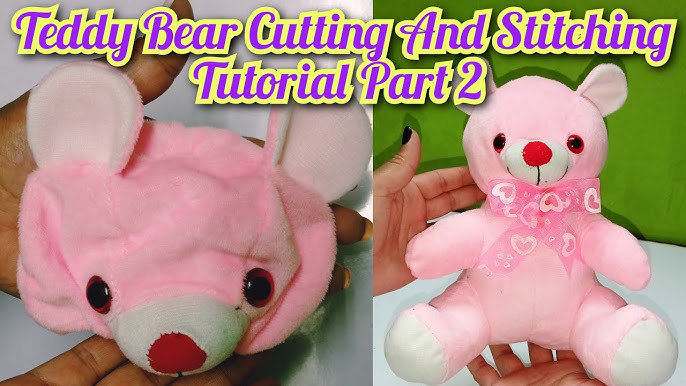
Sewing the seams of your toy bear is where the magic truly begins. This stage brings your fabric pieces together, transforming them from flat shapes into a cuddly friend. With each stitch, you’ll see your bear take shape, filling with character and warmth. Before you start, ensure your fabric pieces are aligned correctly. Pin them together carefully to avoid any misalignments. Use a backstitch for durability, especially if the bear is meant for a child. Closing the BearOnce the seams are sewn, it’s time to close up your bear. Leave a small opening to turn your bear right side out and for stuffing. Use a ladder stitch to close this gap neatly after stuffing. Check the seams for any loose threads. A double stitch can help reinforce areas that might need extra strength. This step ensures your bear is ready for lots of hugs and cuddles. Finishing TouchesThe final touches bring your bear to life. Add eyes, a nose, and maybe a smile with embroidery or buttons. Consider adding a bow tie or a small scarf for personality. Think about what makes your bear unique. Maybe a heart-shaped patch on its chest or a small pocket for storing tiny treasures. These finishing touches make your bear more than just a toy—they give it a story and character. Does your bear have a name yet? Naming your creation can be the most delightful part of the process. It’s amazing how a few simple steps can transform fabric into a beloved companion.

Credit: www.youtube.com
Adding Facial Features
Adding eyes, a nose, and a mouth brings your toy bear to life. Use buttons or fabric for eyes. Sew or glue them on carefully. For the nose, a small piece of felt works well. Create a cute smile with thread or fabric paint.
This adds charm and personality.
Adding facial features to your toy bear is where the magic truly happens. This is the moment your creation comes to life, gaining personality and charm. It’s not just about aesthetics; it’s about imbuing your bear with character and warmth. Think about it: what expression will your bear wear? A gentle smile, a cheeky grin, or maybe a serene look? These features will not only make your bear unique but also tell a story. Here are some practical ways to add facial features to your toy bear, each offering a chance to put your personal touch on your creation.
Embroidering The Face
Embroidering the face of your toy bear is a rewarding task that requires a steady hand and a bit of patience. Start by choosing the thread colors that suit your bear’s personality. A bright red could give a cheerful look, while black might offer a more classic appearance. Use simple stitches like backstitch or satin stitch to create features such as the mouth and eyebrows. Don’t rush; embroidery is a craft where precision pays off. Have you ever noticed how a subtle tweak can change an entire expression? A slightly curved line can transform a straight mouth into a friendly smile.
Attaching Eyes And Nose
Choosing the right eyes and nose is crucial in defining your bear’s character. Safety eyes are a popular choice for their ease of use and durability, especially if the bear will be a child’s companion. Alternatively, buttons or felt pieces can add a unique flair. When attaching, ensure they are securely fastened. This ensures they withstand cuddles and playtimes. Consider the positioning carefully. Eyes placed closer together can create a cute, endearing look, while wider eyes might give a more curious expression. Remember, the nose is the finishing touch that pulls the features together. Opt for a nose that complements the eyes, either matching or contrasting in color for added character.
Final Touches
After assembling the main body of your toy bear, it’s time to add those final touches that bring it to life. These small details can make a big difference in the overall appearance and appeal of your creation. It’s your chance to personalize the bear and ensure it’s both adorable and safe for its intended audience.
Decorative Elements
Adding decorative elements can transform your toy bear from simple to spectacular. Consider sewing on buttons or using felt to create features like eyes, nose, and a mouth. You might even stitch a little outfit or accessories like a scarf or hat. These choices make your bear unique and special.
Think about color and texture. Do you want your bear to have a playful, bright look or a more natural, earthy appearance? Choose fabrics and materials that reflect your vision. Remember, these elements should be securely attached to avoid any potential hazards.
Safety Checks
Before declaring your bear complete, conduct thorough safety checks. Ensure all decorative elements are firmly attached. Loose parts can pose choking hazards, especially for young children.
Inspect all seams and stitches. They should be strong enough to withstand playful tugging and squeezing. Consider using non-toxic materials and avoid sharp edges or small parts that could detach easily.
Ask yourself: Would you feel comfortable giving this toy bear to a child? If the answer is yes, you’ve succeeded in creating a safe and delightful toy.
Credit: www.youtube.com
Frequently Asked Questions
What Materials Do I Need To Make A Toy Bear?
To make a toy bear, you’ll need fabric, stuffing, scissors, needle, thread, and a pattern. Choose soft fabric like fleece or cotton for a cuddly feel. Use hypoallergenic stuffing to ensure it’s safe for children. Patterns can be found online or in craft stores for various bear designs.
How Long Does It Take To Make A Toy Bear?
Making a toy bear can take anywhere from 2 to 5 hours. The time depends on your sewing skills and the complexity of the design. Beginners might need more time, while experienced crafters may finish quicker. Plan your schedule to accommodate this creative project.
Can I Make A Toy Bear Without Sewing?
Yes, you can make a no-sew toy bear using glue or fabric adhesive. Cut out bear shapes from felt and use glue to attach parts. Ensure the adhesive is child-safe and non-toxic. This method is quick and great for crafting with kids or beginners.
What Size Should My Toy Bear Be?
The size of your toy bear depends on personal preference and purpose. Common sizes range from 8 to 12 inches tall. A smaller bear is easier for children to handle. Larger bears can be great for cuddling. Choose a size that suits your crafting skills and intended use.
Conclusion
Creating a toy bear can be a fun project. It offers a chance to express creativity. With simple steps, anyone can make one. Choose soft fabric for a cuddly feel. Sew carefully to avoid gaps. Personalize it with buttons and bows.
Kids will love their handmade friend. Adults too! A homemade toy bear makes a special gift. It’s a project worth trying. Enjoy the process. Share the joy with family and friends. Remember, practice makes perfect. Keep crafting and have fun!